

As someone who has battled with temperamental printers for years, I can tell you there’s nothing quite as frustrating as preparing to print an important document, only to discover faded text, streaky images, or worse—nothing at all. Dry printer ink is a common issue that affects virtually everyone who owns a printer, but the good news is that many cartridges can be salvaged with some simple techniques.
In this article, I’ll walk you through proven methods to revive dried ink cartridges, potentially saving you money and a trip to the store. The approach differs slightly depending on your printer type, so I’ve organized solutions based on whether your ink cartridges have built-in printheads or your printer uses separate printheads.
Understanding Why Printer Ink Dries Out
Before diving into solutions, it helps to understand why this problem occurs in the first place. Printer ink dries out for several reasons:
- Infrequent use: When printers sit idle for weeks or months, ink can dry in the nozzles
- Improper storage: Cartridges stored in hot or dry environments are more prone to drying
- Age: Ink cartridges have a shelf life, and older cartridges are more likely to develop problems
- Low humidity: Printers in particularly dry environments may experience more frequent drying issues
Knowing what causes dry ink can help prevent the problem from recurring after you’ve fixed it. Now, let’s look at how to address those stubborn dry cartridges.
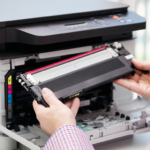
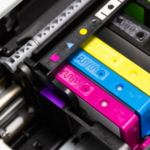
For Ink Cartridges with Built-In Printheads
Many consumer printers, particularly those from HP, Canon, and some Epson models, use ink cartridges with integrated printheads. These cartridges house both the ink supply and the printhead in a single unit. If your cartridge looks like this, try these methods:
1. The Warm Damp Paper Towel Method
This simple technique often works wonders for partially clogged printheads:
- Start by dampening a paper towel with warm (not hot) water
- Fold the paper towel once or twice and place it flat on a plate or other water-resistant surface
- Remove the cartridge from your printer, being careful not to touch the copper contacts or the printhead surface
- Gently press the printhead (the part with tiny holes where ink comes out) against the damp paper towel
- Hold it there for about 30 seconds, applying light pressure
- Without lifting, slide the cartridge across the towel several times in different directions
- You should see ink bleeding onto the paper towel – this is a good sign!
- Repeat the process until you see consistent ink flow from all color sections
This method works by softening the dried ink in the printhead nozzles while simultaneously drawing fresh ink down from the reservoir through capillary action. It’s particularly effective for cartridges that haven’t been used in a few weeks.
2. The Warm Water Soak Method
For more stubborn clogs, a brief soak can help dissolve hardened ink deposits:
- Find a small, shallow container that won’t be used for food again
- Fill it with about half an inch of warm water (distilled water is preferable)
- Place the cartridge printhead-side down in the water, making sure the water level only contacts the printhead surface
- Allow it to soak for 15-20 seconds – not longer, as extended soaking can damage the cartridge
- Remove the cartridge and gently drag the printhead across a clean paper towel in one smooth motion
- You should see lines of ink on the paper towel
- Repeat the process once or twice if necessary
This method is slightly more aggressive than the damp paper towel technique and works well for cartridges that have been sitting unused for a month or more. Be careful not to submerge the entire cartridge, as water could damage the electronic components.
3. Alcohol-Based Cleaning for Stubborn Clogs
When water-based methods aren’t enough, isopropyl alcohol can help dissolve stubborn ink clogs:
- Obtain high-percentage (90%+) isopropyl alcohol from a pharmacy or electronics store
- Dampen a lint-free cloth or cotton swab with the alcohol
- Gently wipe the printhead surface, being careful not to scrub too hard
- For extremely stubborn clogs, lightly dampen a cotton swab and hold it against the affected nozzle for a few seconds
- Blot (don’t rub) the printhead on a clean paper towel
- Allow the cartridge to air dry for 15 minutes before reinstalling
Alcohol evaporates quickly and is effective at dissolving dried ink residues that water alone can’t handle. However, use this method sparingly, as frequent alcohol cleaning may degrade the printhead materials over time.
For Printers with Separate Printheads
Higher-end printers often use separate printheads and ink tanks. If your printer falls into this category (common with professional-grade Canon, Epson, and Brother printers), try these specialized approaches:
1. Remove and Soak the Printhead
This more involved process requires careful handling but can effectively restore severely clogged printheads:
- Consult your printer manual for specific instructions on removing the printhead assembly
- Once removed, prepare a cleaning solution of one part isopropyl alcohol to two parts distilled water
- Place the printhead in a shallow container with enough solution to cover the nozzle plate (but not submerge electronic components)
- Allow it to soak for 2 minutes maximum
- Remove and gently blot (don’t wipe) the printhead with a lint-free cloth
- Let it air dry completely for 15-20 minutes before reinstalling
- Run a test print to check if ink flow has improved
This method should only be attempted if you’re comfortable disassembling your printer according to manufacturer instructions. Improper handling can permanently damage expensive printhead components.
2. Utilize Built-in Cleaning Cycles
Before attempting manual cleaning, take advantage of your printer’s built-in maintenance features:
- Access your printer’s maintenance utility through the control panel or computer software
- Look for options labeled “Clean Printhead,” “Nozzle Check,” or “Print Head Alignment”
- Run the cleaning cycle according to manufacturer instructions
- Print a test page to evaluate the results
- If necessary, run a second or third cleaning cycle (though avoid running more than three consecutive cycles, as this can waste ink)
Most modern printers include sophisticated cleaning routines that can clear minor clogs by forcing ink through the nozzles under pressure. This automated approach is often sufficient for printers that are used regularly but occasionally develop printing issues.
Additional Tips for Success
Use Distilled Water
When cleaning printheads or cartridges, always use distilled water rather than tap water. Tap water contains minerals that can leave deposits in the tiny printhead nozzles, potentially causing more problems than they solve.
Test After Cleaning
Always run a test print after any cleaning procedure. Most printers have a built-in test page option that uses minimal ink while showing all colors. This will help you determine if your cleaning efforts were successful or if additional measures are needed.
Know When to Replace
Despite our best efforts, some cartridges are simply beyond salvation. If you’ve tried multiple cleaning methods without improvement, the cartridge may be too dried out to recover. Signs that replacement is necessary include:
- No improvement after trying multiple cleaning methods
- Cartridges older than 6-12 months (depending on storage conditions)
- Physical damage to the printhead surface
- Empty ink level indicators even after attempted revival
Prevention: The Best Medicine
Once you’ve successfully revived your printer cartridges, take steps to prevent the problem from recurring:
- Print something at least once every two weeks, even if it’s just a test page
- Store unused cartridges in sealed plastic bags in a cool, dark place
- Consider using a printer cover if your printer sits in direct sunlight or dusty environments
- Maintain proper humidity levels in your home or office (40-60% is ideal)
- Always power down your printer using the power button rather than unplugging it, as this positions the cartridges in their “home” position with protective caps
Conclusion
Dry printer ink is an annoying but manageable problem. With the techniques outlined above, you can often restore your cartridges to working condition and avoid the expense of premature replacement. Remember that different printer models may respond better to certain methods, so don’t be afraid to try multiple approaches before giving up on a cartridge.
By understanding how to fix dry printer ink and taking preventive measures, you can extend the life of your cartridges and ensure your printer is ready when you need it most. Just remember to work carefully and patiently—rushing the process can damage sensitive components and end up costing more in the long run.
Happy printing!
