
Modern Epson multifunction printers deliver exceptional scanning functionality that transforms physical documents into digital formats within seconds. Whether you’re archiving invoices, digitising family photographs, or creating searchable PDFs for your business, understanding your Epson scanner’s full potential revolutionises document management workflows.
This comprehensive guide walks you through every scanning method available on Epson devices, from basic flatbed operations to advanced network scanning configurations. By mastering these techniques, you’ll streamline administrative tasks whilst maximising your equipment investment.
Understanding Epson Scanning Technology
Types of Epson Scanning Hardware
Epson manufactures three primary scanner configurations:
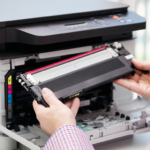
Flatbed Scanners: Glass platen surfaces accommodate bound documents, books, and fragile materials. The EcoTank ET-2820, for instance, features a letter-sized flatbed ideal for standard document capture.
Automatic Document Feeders (ADF): Workforce series models incorporate ADF mechanisms that process multiple pages unattended. These units excel in high-volume environments requiring batch processing.
Portable Scanners: Compact WorkForce DS-series devices offer mobile scanning solutions for field professionals and space-constrained offices.
Resolution and File Format Fundamentals
Scanning resolution determines image clarity and file size. Consider these benchmarks:
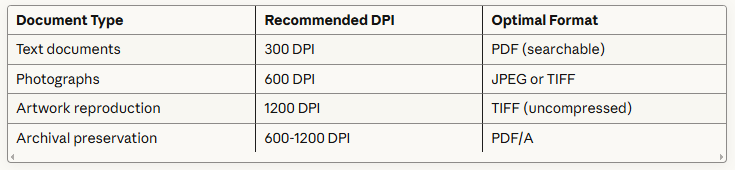
Higher resolution captures finer details but generates larger files. A 300 DPI A4 colour scan typically produces 8-10MB files, whilst 1200 DPI scans can exceed 150MB.
Method 1: Scanning Directly from the Printer Control Panel
Preparing Your Epson Printer
Before initiating scans, ensure proper hardware setup:
- Position the printer on a stable, vibration-free surface
- Verify USB or network connectivity remains active
- Clean the scanner glass with microfibre cloths and isopropyl alcohol solution
- Remove protective sheets from the document feeder if applicable
- Confirm adequate paper in output trays (for scan-to-print functions)
Step-by-Step Control Panel Scanning
Step 1: Lift the scanner lid and position your document face-down on the glass platen. Align the top-left corner with the registration marks—typically indicated by corner arrows or guides.
Step 2: Navigate the LCD touchscreen to locate the ‘Scan’ icon. On non-touchscreen models, press the physical ‘Scan’ button repeatedly until your desired destination appears.
Step 3: Select your scan destination:
- Computer: Transmits files directly to a connected PC
- USB Drive: Saves scans to inserted USB storage devices
- Email: Initiates email client with scan attached (requires email configuration)
- Cloud Services: Uploads to registered cloud platforms
Step 4: Adjust scan settings via the on-screen menu:
- Document type (photo, text, mixed)
- Colour mode (colour, greyscale, monochrome)
- Resolution (draft, standard, high quality)
- File format (PDF, JPEG, TIFF)
Step 5: Press ‘Start’ or the physical scan button. The scanning head traverses the platen, capturing your document with precision LED illumination.
Step 6: Retrieve your file from the designated location. Network-connected printers save to preconfigured folders, whilst USB scans appear in root directories.
Troubleshooting Control Panel Scanning Issues
Encountering errors? Consider these remedial actions:
- “No computer found” errors: Verify Epson Scan software installation and USB cable integrity
- Blank scans: Remove protective films from scanner glass and check document placement
- Incomplete scans: Ensure documents don’t extend beyond scanning area boundaries
- Streaky output: Clean scanner glass and ADF rollers with approved cleaning solutions
Method 2: Scanning Using Epson Scan 2 Software (Windows)
Installing Epson Scan 2 Application
Download the latest Epson Scan 2 software from Epson’s official support portal. Navigate to your printer model’s downloads section and select your Windows operating system version. The installation wizard configures scanner drivers and establishes communication protocols automatically.
Post-installation, access Epson Scan 2 via:
- Windows Start menu > Epson Software > Epson Scan 2
- Desktop shortcut icon (if selected during installation)
- Third-party applications supporting TWAIN/WIA interfaces
Document Mode Scanning Procedures
Full Auto Mode: Intelligent algorithms detect document boundaries, correct skew angles, and optimise image parameters automatically. Perfect for casual users requiring minimal intervention.
Home Mode: Presents simplified controls for common scanning scenarios:
- Launch Epson Scan 2 and select ‘Home Mode’
- Choose document type (Document, Photo, Custom Settings)
- Specify destination (File, Email, Print, Custom Application)
- Configure image adjustments if needed (brightness, contrast, descreening)
- Preview the scan by clicking ‘Preview’ button
- Define scanning area using crop handles if required
- Click ‘Scan’ to commence capture
Professional Mode: Exposes advanced parameters for demanding applications:
- Input Settings: Configure scanner source (flatbed/ADF), document size, and auto-detection options
- Output Settings: Specify resolution, scale percentages, and rotation angles
- Image Adjustments: Manipulate tone curves, apply unsharp masking, remove moiré patterns
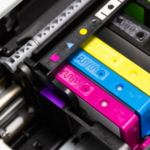
- Colour Management: Implement ICC profiles for accurate colour reproduction
Professional Mode enables sophisticated workflows including:
- Multi-page PDF compilation
- Automatic blank page removal
- Text enhancement filters for OCR preparation
- Custom resolution settings beyond preset values
Batch Scanning with ADF Units
Automatic document feeders revolutionise high-volume scanning:
- Load documents into the ADF tray (typically 35-50 sheet capacity)
- Select ‘Document Feeder’ as the Document Source in Epson Scan 2
- Enable ‘Auto Scan’ mode for continuous multi-page capture
- Configure separation options (create individual files or single multi-page document)
- Initiate scanning—the ADF processes pages sequentially
Pro Tip: Fan document stacks before loading to prevent multi-feeds. Slightly offset pages create air pockets that facilitate clean separation.
Method 3: Scanning with Epson iPrint Mobile App
iOS and Android Setup
Mobile scanning delivers unprecedented flexibility for modern workflows. Download Epson iPrint from the App Store or Google Play Store, then follow these configuration steps:
- Connect your mobile device to the same Wi-Fi network as your Epson printer
- Launch Epson iPrint and tap ‘Scan’
- The application automatically discovers network-connected Epson devices
- Select your printer from the detected devices list
Mobile Scanning Workflow
The Epson iPrint interface simplifies mobile document capture:
- Scan Mode Selection: Choose between document and photo presets
- Resolution Configuration: Toggle between standard (200 DPI) and high quality (600 DPI)
- Colour Options: Select colour, greyscale, or monochrome output
- Size Detection: Enable automatic document size recognition
After configuring parameters, tap the scan button. Your mobile device receives the scanned image within seconds, ready for annotation, sharing, or cloud synchronisation.
Advanced Mobile Features:
- Multi-page PDF compilation directly within the app
- Cloud service integration (Google Drive, Dropbox, OneDrive)
- Email attachment functionality with in-app composition
- OCR text recognition (on supported devices)
Method 4: Network Scanning Configuration
Establishing Network Scan Folders
Enterprise environments benefit from centralised network scanning:
Windows Network Setup:
- Create a dedicated folder on your network drive (e.g., Z:\Scanned_Documents)
- Configure sharing permissions allowing read/write access
- Access your printer’s web interface by entering its IP address in a browser
- Navigate to Network > Scan to Network settings
- Register the network folder path using UNC notation (\\server\share\folder)
- Assign a descriptive name for control panel identification
- Test connectivity using the verification button
Authentication Requirements: Many network folders require credentials. Store login information within the printer’s secure credential vault to enable seamless automated scanning.
Scan-to-Email Configuration
Email scanning eliminates manual file transfers:
- Access printer web configuration interface
- Navigate to Email Server Settings
- Input SMTP server details:
- Server address (smtp.yourdomain.com)
- Port number (typically 587 for TLS, 465 for SSL)
- Authentication credentials
- Sender email address
- Create email templates with predefined recipients, subjects, and body text
- Test configuration by sending a test email
Once configured, control panel users simply select the appropriate email template and press scan. Documents arrive in recipients’ inboxes within moments.
Optimising Scan Quality and File Sizes
Balancing Clarity and Storage Efficiency
Excessive resolution wastes storage whilst insufficient DPI compromises legibility. Apply these industry-proven guidelines:
Text Documents: 300 DPI monochrome scanning produces crisp, OCR-ready files averaging 50-100KB per page. Compression algorithms in PDF formats significantly reduce file sizes without perceptible quality degradation.
Photographic Materials: 600 DPI colour scanning captures photographic nuances whilst maintaining manageable file sizes. Apply moderate JPEG compression (quality level 85-90) for archival purposes.
Line Art and Drawings: Monochrome scanning at 600-1200 DPI preserves fine linework. Save as TIFF or high-quality PDF to avoid compression artefacts.
Image Enhancement Techniques
Epson Scan 2 incorporates sophisticated enhancement algorithms:
- Descreening Filters: Eliminate halftone patterns from magazine scans and printed materials
- Backlight Correction: Recovers detail from underexposed photographs
- Dust Removal: Automatically detects and eliminates dust specks from film scans
- Text Enhancement: Increases contrast between text and background for improved OCR accuracy
Experiment with these filters using preview functions before committing to final scans. Overapplication can introduce unwanted artefacts or unnatural appearances.
Advanced Scanning Techniques for Professionals
Creating Searchable PDFs with OCR
Optical Character Recognition transforms scanned images into searchable, editable text:
- Scan documents at 300 DPI minimum (400 DPI improves accuracy)
- Select ‘Searchable PDF’ as output format in Epson Scan 2
- Specify OCR language (critical for accurate recognition)
- Process the scan—embedded OCR engines analyse text regions
- Verify accuracy by searching for specific terms within the PDF
Optimisation Strategies: Clean originals, adequate contrast, and proper orientation dramatically improve OCR accuracy. Crumpled, faded, or skewed documents require manual correction before scanning.
Custom Scanning Profiles
Frequent scanning tasks benefit from saved profiles:
- Configure all desired settings (resolution, format, destination, adjustments)
- Click ‘Save Settings’ or ‘Add Profile’ in Epson Scan 2
- Assign a descriptive name (‘High-Res Archive’, ‘Email-Ready Documents’)
- Access saved profiles via dropdown menus for instant configuration
This workflow efficiency proves invaluable in commercial environments processing hundreds of documents daily.
Colour Management for Accurate Reproduction
Professional scanning demands colour fidelity:
- ICC Profiles: Install and select appropriate colour profiles matching your scanner and display
- Calibration: Regularly calibrate monitors to ensure accurate colour representation
- Target Scanning: Use IT8 calibration targets to characterise scanner response
- Proof Scanning: Create test scans and compare against originals under controlled lighting
These measures ensure archival scans authentically represent original materials—essential for art reproduction, legal documentation, and commercial photography.
Maintaining Your Epson Scanner
Routine Cleaning Protocols
Scanner maintenance directly impacts output quality:
Weekly Cleaning (high-volume environments):
- Wipe scanner glass with lint-free microfibre cloths
- Apply isopropyl alcohol solution for stubborn residue
- Clean ADF rollers with approved cleaning sheets
- Remove dust from document guides and sensors
Monthly Maintenance:
- Inspect and clean the underside of the scanner lid
- Check ADF pickup rollers for wear or contamination
- Verify calibration strip cleanliness (white reference bar)
- Update scanner firmware and software drivers
Annual Servicing:
- Professional sensor calibration
- Mechanical component inspection
- Lamp intensity verification
- Comprehensive diagnostic testing
Extending Scanner Lifespan
Thoughtful operation preserves equipment longevity:
- Avoid scanning damaged documents that may scratch glass surfaces
- Remove staples, paperclips, and binding elements before ADF scanning
- Power down scanners during extended idle periods
- Protect devices from direct sunlight and environmental contaminants
- Maintain moderate temperature and humidity levels (20-25°C, 40-60% RH)
Troubleshooting Common Epson Scanning Problems
Connection and Communication Errors
USB Connection Failures:
- Test alternative USB ports (preferably USB 3.0)
- Replace suspected faulty cables
- Update USB controller drivers in Device Manager
- Disable USB selective suspend in power settings
Network Scanning Issues:
- Verify printer and computer occupy the same network subnet
- Configure firewall exceptions for Epson scanning protocols
- Assign static IP addresses to prevent DHCP conflicts
- Update network adapter drivers and firmware
Image Quality Defects
Vertical Lines or Streaks:
- Clean scanner glass and ADF glass strips thoroughly
- Inspect for scratches or permanent damage
- Replace worn ADF rollers
- Run printer cleaning utilities
Blurry or Unfocused Scans:
- Ensure documents lie flat against glass
- Close scanner lid completely
- Verify proper focus distance (critical for book scanning)
- Check for condensation on scanner glass in humid environments
Colour Casts or Inaccurate Colours:
- Recalibrate scanner using built-in calibration functions
- Update colour profiles to current versions
- Verify lamp functionality and colour temperature
- Consider professional sensor evaluation if persistent
Conclusion: Maximising Your Epson Scanning Investment
Mastering Epson scanning technology transforms document management from tedious obligation into streamlined efficiency. Whether you’re processing occasional receipts or managing enterprise-level document workflows, understanding these techniques ensures optimal results.
Modern Epson multifunction devices deliver professional-grade scanning capabilities accessible to users of all skill levels. By implementing the methods, optimisations, and maintenance practices outlined above, you’ll preserve important documents, reduce physical storage requirements, and enhance organisational productivity for years to come.
The transition to digital document management represents more than technological adoption—it’s a strategic investment in operational efficiency, environmental sustainability, and business continuity. Your Epson scanner serves as the gateway to this digital transformation, ready to capture every critical document with exceptional clarity and reliability.
FAQs
How do I scan a document from my Epson printer to my computer?
Place your document face-down on the scanner glass, then use either the printer’s control panel to select ‘Scan to Computer’, or launch Epson Scan 2 software on your PC and click ‘Scan’. The document will save to your designated folder automatically.
Why won’t my Epson printer scan to my computer?
Common causes include outdated Epson Scan software, USB connection issues, or firewall blocking scanner communication. Update your scanner drivers from Epson’s support website, verify cable connections, and configure Windows Firewall to allow Epson scanning applications.
Can I scan documents without installing Epson software?
Windows includes basic scanning functionality through Windows Fax and Scan utility, which supports Epson devices via WIA drivers. However, Epson Scan 2 provides significantly more features, better image quality controls, and enhanced functionality compared to generic Windows scanning tools.
How do I scan multiple pages into one PDF on my Epson printer?
In Epson Scan 2, select ‘Save as PDF’ and enable ‘Create multi-page file’ option. Scan each page sequentially, and the software automatically compiles them into a single PDF document. Alternatively, use the ADF feeder with ‘Continue Scanning’ enabled.
What resolution should I use for scanning documents?
Use 300 DPI for standard text documents, 600 DPI for photographs and detailed images, and 1200 DPI for archival-quality artwork or materials requiring extreme detail. Higher resolutions create larger files but capture finer details.
How do I scan from my Epson printer to email?
Configure SMTP settings in your printer’s web interface, then select ‘Scan to Email’ from the control panel. Enter recipient addresses and press scan. Alternatively, scan to your computer first, then attach the file to an email manually for greater flexibility.
Why are my scanned documents coming out blurry?
Blurry scans typically result from dirty scanner glass, insufficient resolution settings, or documents not lying flat. Clean the scanner glass thoroughly, increase scanning resolution to at least 300 DPI, and ensure the scanner lid closes completely.
How do I scan on Epson printer without USB cable?
Enable Wi-Fi connectivity on your Epson printer and install Epson iPrint mobile app on your smartphone or tablet. Alternatively, configure network scanning to save files directly to network folders accessible from any computer on your local network.
Can I scan both sides of a document automatically?
Models equipped with duplex ADF units (like Epson WorkForce Pro series) automatically scan both sides of documents. Enable ‘Duplex’ or ‘2-Sided’ scanning in your scan settings before processing multi-page documents through the document feeder.
How do I improve the quality of scanned documents?
Increase scanning resolution to 400-600 DPI, ensure scanner glass is spotlessly clean, enable text enhancement filters in Epson Scan 2, and use the ‘Auto Exposure’ feature. For colour accuracy, implement proper ICC colour profiles and calibrate your scanner periodically.
