Troubleshoot Epson printers have earned their reputation as workhorses in both commercial and domestic environments, yet even the most robust devices encounter operational hiccups. Having spent fifteen years diagnosing print production anomalies across countless installations, I’ve witnessed recurring patterns that, once understood, transform frustrating breakdowns into manageable maintenance tasks. This comprehensive guide dissects the most prevalent Epson printer malfunctions whilst providing battle-tested remediation strategies that restore functionality without necessitating expensive service calls.
Understanding Your Epson Printer’s Core Components
Before diving into troubleshooting methodologies, establishing foundational knowledge of your device’s architecture proves invaluable. Epson employs sophisticated piezoelectric printhead technology across their consumer and professional ranges, distinguishing their approach from thermal inkjet competitors. This crystalline actuator system propels microscopic ink droplets with exceptional precision, yet remains susceptible to clogging, contamination, and calibration drift.
The Printhead Assembly and Ink Delivery System
The printhead constitutes the most critical—and expensive—component within your printer’s ecosystem. Epson’s Micro Piezo technology utilises voltage-controlled crystals that contract and expand, forcing ink through nozzles measuring mere microns in diameter. This delivery mechanism requires unobstructed fluid pathways from cartridge reservoirs through manifold channels to ejection chambers. Any particulate intrusion or air bubble formation compromises this delicate hydraulic network.
Modern Epson units incorporate printhead cleaning mechanisms that execute automated purge cycles, drawing ink through blocked nozzles using a suction pump assembly. The waste ink accumulates within absorbent pads located beneath the carriage assembly—a detail that becomes significant when addressing service-required error messages.
Paper Feed Mechanisms and Roller Configuration
Paper transport systems employ a series of precisely machined rubber rollers working in concert to maintain consistent media advancement. The pickup roller initiates sheet separation from the input tray, whilst feed rollers maintain traction throughout the print path. Separation pads prevent multiple sheets from entering simultaneously—a common source of jam conditions. Over time, these rubber components develop glazing, losing their coefficient of friction and leading to misfeeds or ghosted prints where paper slippage occurs mid-cycle.
Driver Software and Firmware Architecture
The printer driver serves as the translation layer between application-generated content and device-specific instruction sets. Epson’s proprietary drivers incorporate colour management profiles, resolution scaling algorithms, and queue management protocols. Firmware embedded within the printer’s controller board interprets these rasterised commands, coordinating stepper motor movements, ink valve actuation, and sensor monitoring. Version mismatches between these software layers frequently manifest as communication errors or degraded output quality.
Paper Jams and Feed Malfunctions
Paper jams represent the most frequently encountered printer malady, often stemming from seemingly innocuous environmental factors or media quality compromises. After years of field diagnostics, I’ve identified several primary culprits that account for the majority of feed disruptions.
Identifying the Root Cause of Paper Jams
Begin by examining the paper stock itself. Media weight outside the manufacturer’s specified range (typically 64–90 gsm for standard paper paths) creates undue stress on feed mechanisms. Curled sheets, moisture-damaged stock, or paper stored in fluctuating humidity conditions readily trigger jams. Always fan your paper stack before loading, separating individual sheets to prevent electrostatic adhesion.
Observe where jams consistently occur:
- Input tray jams suggest pickup roller degradation or incorrect paper guides
- Mid-print path jams indicate foreign object obstruction or sensor malfunctions
- Output tray jams point to insufficient clearance or exit roller contamination
Step-by-Step Jam Clearance Protocol
When addressing a paper jam, methodology matters. Forceful extraction damages delicate components and leaves torn fragments that precipitate future jams. Follow this systematic approach:
- Power down the device completely and disconnect from mains supply
- Open all access doors to visualise the entire paper path
- Rotate the rear access panel (present on most Epson models) for optimal clearance angle
- Gently extract paper following the natural feed direction—never pull backwards against roller rotation
- Inspect for residual fragments using a torch, checking beneath the printhead carriage
- Examine rollers for contamination and clean using isopropyl alcohol on lint-free cloth
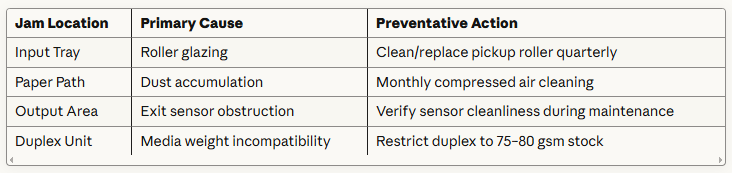
Preventative Maintenance for Feed Rollers
Roller rejuvenation extends component lifespan significantly. Remove accessible rollers (consult your service manual for model-specific procedures) and clean with dedicated rubber rejuvenator compounds—avoid petroleum-based solvents that accelerate deterioration. For non-removable rollers, dampen a lint-free cloth with distilled water and rotate manually whilst applying gentle pressure to dislodge accumulated paper residue and toner dust.
Print Quality Deterioration and Output Defects
Output quality degradation rarely occurs instantaneously; rather, it manifests progressively as components wear or consumables deplete. Recognising early warning signs prevents catastrophic failures requiring complete printhead replacement.
Banding, Streaking, and Colour Inconsistencies
Horizontal banding—repeating light or dark lines perpendicular to print direction—stems from clogged nozzles or inconsistent ink flow. Execute your printer’s built-in nozzle check utility, accessible through maintenance menus or driver software. The resulting pattern reveals which colour channels exhibit blockages.
For minor clogs, standard cleaning cycles suffice. Persistent blockages necessitate more aggressive power cleaning functions, though excessive cleaning cycles deplete ink reserves rapidly whilst accelerating waste pad saturation. If three consecutive power cleans fail to restore nozzle functionality, manual intervention becomes necessary.
Advanced printhead restoration technique: Remove cartridges and locate the printhead parking position (where the carriage rests when idle). Apply pharmaceutical-grade cleaning solution specifically formulated for piezoelectric printheads—never use water or generic cleaning fluids. Allow capillary action to draw solution through nozzle plates for 30–60 minutes before reinstalling cartridges and executing a cleaning cycle.
Vertical streaking indicates carriage rail contamination or encoder strip fouling. The encoder strip—a transparent plastic ribbon marked with precise calibration lines—guides carriage positioning. Fingerprints, dust, or ink overspray on this component cause positional errors. Clean gently using microfibre cloth dampened with distilled water, working from centre outward.
Faded Prints and Ink Saturation Problems
Anaemic output despite full cartridges frequently results from incorrect media type selection within driver settings. Epson’s adaptive ink deposition algorithms adjust droplet volume and pattern density based on selected substrate characteristics. Selecting “Plain Paper” when printing on glossy photo media drastically reduces ink application, preventing saturation that would cause smearing on porous stocks.
Verify your driver settings match physical media loaded:
- Plain Paper: Maximum ink restriction, fast drying
- Premium Presentation Matte: Moderate ink application, enhanced colour gamut
- Photo Paper Glossy: Maximum saturation, extended drying time
- Fine Art Paper: Balanced deposition with red-shifted colour profiles
Air ingress into the ink delivery system also causes faded prints. Cartridges installed improperly or damaged during shipping allow atmospheric pressure to disrupt the hydraulic balance required for consistent flow. Reseat all cartridges firmly until audible clicks confirm engagement.
Misalignment and Registration Errors
When separate colour layers fail to align precisely, text appears fuzzy and images exhibit chromatic aberration. This registration drift occurs when the printer loses its internal calibration reference. All Epson models incorporate automatic alignment utilities that print test patterns and use optical sensors to measure positional deviations.
Access this function through:
- Printer’s LCD control panel → Setup → Maintenance → Print Head Alignment
- Windows driver properties → Maintenance tab → Head Alignment
- macOS System Preferences → Printers & Scanners → select printer → Options & Supplies → Utility tab
Execute bidirectional alignment first (adjusting left-to-right versus right-to-left carriage passes), followed by vertical alignment if supported by your model.
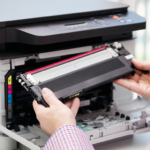
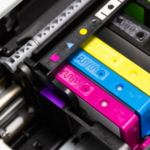
Ink Cartridge Recognition Failures
Few malfunctions generate more user frustration than cartridge recognition errors, particularly when cartridges contain substantial ink reserves. These failures typically originate from communication disruptions between cartridge integrated circuits and printer controller boards.
Cartridge Chip Communication Issues
Each genuine Epson cartridge incorporates a sophisticated microchip storing ink level data, authentication credentials, and usage history. Spring-loaded contact pins within the cartridge bay establish electrical connection during installation. Oxidation, debris accumulation, or mechanical wear on these contacts interrupts data transmission, triggering “cartridge not recognised” errors.
Remediation involves meticulous contact cleaning using isopropyl alcohol (minimum 90% concentration) applied with cotton swabs. Clean both cartridge chip contacts and printer bay pins, allowing complete evaporation before reinstallation. If problems persist, gently burnish printer contacts with 2000-grit abrasive paper to remove oxidation layers—exercise extreme caution to avoid deforming delicate spring mechanisms.
Genuine Versus Compatible Cartridge Troubleshooting
Third-party cartridge manufacturers reverse-engineer Epson’s chip authentication protocols with varying success rates. Whilst compatible cartridges offer substantial cost savings, they introduce additional failure vectors. Firmware updates occasionally alter authentication algorithms, rendering previously functional compatibles inoperative—a calculated obsolescence strategy manufacturers defend as security enhancement.
When using compatible cartridges, document your firmware version before any updates. If recognition failures coincide with recent firmware changes, downgrading may restore functionality, though Epson increasingly restricts this option through irreversible update mechanisms.
Resetting Ink Level Monitoring Systems
Epson employs non-resetable ink monitoring, meaning cartridges register as empty when internal algorithms calculate depletion based on page coverage analysis rather than physical level sensing. This approach prevents air ingress that would damage printheads but occasionally triggers premature empty warnings.
Some users employ chip resetters—external devices that rewrite cartridge chip data to restore full status. However, operating with truly depleted cartridges risks catastrophic printhead damage when air enters the hydraulic system during printing. The repair costs dwarf any savings from squeezing extra pages from cartridges.
Connectivity and Network Configuration Problems
Modern Epson printers function as networked peripherals, introducing connectivity complexities absent from earlier parallel-port devices. Wireless configurations prove particularly temperamental, susceptible to interference and protocol handshake failures.
Wi-Fi Connection Drop-Outs and Signal Interference
Intermittent wireless connectivity typically stems from insufficient signal strength or frequency congestion. Epson printers predominantly utilise 2.4 GHz wireless bands—the same spectrum occupied by Bluetooth devices, microwave ovens, and neighbouring networks. This congestion causes packet loss and authentication failures.
Diagnostic approach:
- Position printer within direct line-of-sight of wireless router, minimising signal attenuation through walls
- Access router administration interface and verify 2.4 GHz channel selection—manually configure to channels 1, 6, or 11 (non-overlapping frequencies)
- Disable router security settings temporarily to isolate authentication versus signal strength issues
- Check for firmware updates addressing wireless stability on both printer and router
For professional environments with dozens of competing wireless networks, hardwired Ethernet connections eliminate variables whilst providing superior bandwidth and latency characteristics.
USB Device Recognition Failures
Direct USB connections seemingly offer simplicity but introduce driver enumeration complexities. Windows operating systems maintain a database of previously connected devices, occasionally creating conflicts when USB ports change or drivers update.
If your PC fails to recognise a USB-connected printer:
- Disconnect printer USB cable and navigate to Device Manager
- Expand “Printers” and “USB controllers” sections
- Uninstalls any Epson entries showing warning icons
- Connect printer whilst monitoring Device Manager for new device enumeration
- Manually specify driver location if Windows fails automatic installation
USB cable quality matters more than commonly appreciated. Cables exceeding 3 metres introduce signal degradation, whilst bargain cables often lack proper shielding against electromagnetic interference. Invest in certified USB 2.0 cables with ferrite core suppressors for reliable data transmission.
Network Printer Discovery and IP Configuration
Network-connected printers require IP addressing for device identification. Most users rely on DHCP (Dynamic Host Configuration Protocol), where routers automatically assign addresses—convenient but problematic when addresses change and driver configurations become outdated.
Implementing static IP addressing provides stability:
- Access printer’s LCD menu → Network Settings → Wi-Fi/Wired Setup
- Note current IP address, subnet mask, and gateway values assigned by DHCP
- Disable DHCP and manually enter current values, ensuring no conflicts with other devices
- Update driver configurations on all computers to reference the static address
Professional environments benefit from reserving specific IP addresses within router DHCP configurations, combining automatic assignment convenience with static address predictability.
Error Messages and Diagnostic Codes
Epson’s error notification system employs alphanumeric codes that, whilst initially cryptic, provide precise diagnostic information once decoded. Understanding common error families accelerates troubleshooting.
Decoding Common Epson Error Notifications
Service Required Indicators and Maintenance Alerts
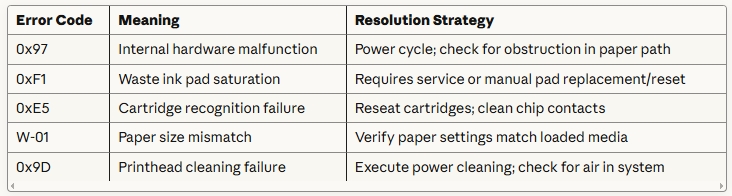
Epson printers incorporate internal page counters tracking waste ink accumulation. When thresholds trigger, devices display “Service Required” messages and cease operation—a programmed obsolescence mechanism ostensibly protecting users from ink overflow but conveniently coinciding with typical device replacement cycles.
Third-party utilities exist that reset these counters, though doing so without addressing actual pad saturation risks genuine overflow damage. For high-volume users, external waste ink systems divert fluid to external reservoirs, eliminating pad saturation as a limiting factor.
Waste Ink Pad Counter Resets
Waste ink pad replacement requires partial printer disassembly—a task within competent DIY capabilities but voiding warranties. Replacement pads purchased from aftermarket suppliers cost substantially less than manufacturer service fees. Following pad replacement, counter resets become necessary using model-specific utilities.
Proceed with caution: Incorrect reset procedures brick some printer models. Research thoroughly using model-specific forums before attempting resets. For valuable equipment, professional service remains the prudent choice.
Driver Installation and Software Conflicts
Software-related printer issues manifest as the most perplexing problems for end-users, as symptoms appear identical to hardware failures yet resist physical intervention. After years of remote diagnostics, I’ve refined systematic approaches that isolate software variables efficiently.
Operating System Compatibility Issues
Each Windows iteration introduces architectural changes affecting driver compatibility. Windows 10 and 11 employ stricter driver signing requirements, rejecting older Epson drivers lacking current certificates. Conversely, some legacy printer models never received certified drivers for current operating systems.
When installing printers on contemporary systems:
- Download drivers exclusively from Epson’s official support portal—third-party driver repositories often distribute outdated or malware-infected files
- Install drivers with administrative privileges, right-clicking installers and selecting “Run as administrator”
- Temporarily disable antivirus software during installation, as heuristic scanning occasionally blocks legitimate driver components
- Verify Windows Update hasn’t installed generic “Microsoft Print to PDF” drivers that supersede Epson-specific drivers
Corrupted Driver Files and Registry Conflicts
Windows Print Spooler service manages print queue operations, maintaining temporary files and coordinating between applications and physical devices. Corrupted spooler data files precipitate bizarre symptoms: phantom print jobs, spontaneous reboots, or complete print subsystem failures.
Comprehensive spooler reset procedure:
- Open Services console (
services.msc) - Stop “Print Spooler” service
- Navigate to
C:\Windows\System32\spool\PRINTERS - Delete all files within (requires administrator permissions)
- Restart Print Spooler service
- Reinstall printer using fresh driver download
For persistent issues, third-party utilities like Print Spooler Repair Tool automate this process whilst addressing registry inconsistencies.
Print Spooler Service Troubleshooting
If Print Spooler refuses to start or crashes immediately upon starting, driver conflicts require resolution through process of elimination. Boot Windows into Safe Mode, where only essential drivers load. If Print Spooler operates correctly in Safe Mode, recently installed drivers likely contain conflicts.
Systematically uninstall printer drivers (oldest installations first) until stability returns, then reinstall drivers one-by-one, testing spooler operation after each installation to identify the problematic driver.
Performance Optimisation and Longevity Strategies
Proactive maintenance dramatically extends printer operational lifespan whilst minimising emergency troubleshooting incidents. Commercial installations I’ve managed with rigorous maintenance schedules routinely exceed manufacturer-estimated duty cycles by 40–60%.
Establishing Regular Maintenance Schedules
Implement tiered maintenance protocols based on usage intensity:
Weekly (high-volume environments):
- Execute nozzle check and single cleaning cycle
- Verify paper stock freshness and storage conditions
- Inspect output tray for debris accumulation
Monthly:
- Deep clean exterior surfaces and ventilation grilles using compressed air
- Clean accessible rollers using rubber rejuvenator
- Verify driver versions match current firmware
- Execute complete printhead alignment routine
Quarterly:
- Comprehensive internal cleaning including encoder strip, carriage rails, and paper path
- Cartridge replacement even if ink remains (prevents crystallisation issues)
- Firmware update evaluation and installation
- Contact spring inspection and cleaning
Environmental Factors Affecting Printer Performance
Temperature and humidity extremes wreak havoc on precision printing systems. Epson specifies operational ranges of 10–35°C and 20–80% relative humidity—outside these parameters, ink viscosity changes, paper dimensions shift, and electronic components malfunction.
Cold environments thicken ink, increasing printhead firing voltage requirements and accelerating wear. Excessively dry conditions induce static electricity buildup causing paper jams and dust attraction. Conversely, high humidity encourages paper curl and mould growth on absorber pads.
For optimal performance, maintain printers in climate-controlled environments. If impossible, allow warm-up periods in cold conditions before initiating print jobs, giving ink time to reach optimal viscosity.
Firmware Updates and Feature Enhancements
Epson periodically releases firmware updates addressing identified defects or enhancing functionality. However, approach updates judiciously—premature adoption occasionally introduces new bugs. Monitor user forums for feedback on recent releases before updating production equipment.
Firmware updates occasionally modify cartridge authentication protocols, potentially rendering previously compatible third-party cartridges inoperative. Document current firmware version before updating and verify cartridge compatibility post-update.
FAQs
1. Why does my Epson printer keep jamming paper?
Paper jams typically result from degraded pickup rollers, incorrect paper type, moisture-damaged media, or debris in the paper path. Clean rollers quarterly with isopropyl alcohol, ensure paper weight falls within 64–90 gsm specifications, and store media in humidity-controlled environments below 60% relative humidity.
2. How do I fix horizontal lines on my Epson prints?
Horizontal banding indicates clogged printhead nozzles. Execute a nozzle check from your printer’s maintenance menu, then run standard or power cleaning cycles as needed. If three consecutive cleanings fail, manually clean the printhead using pharmaceutical-grade piezoelectric cleaning solution applied during the 30-minute soak method.
3. What does Epson error code 0xF1 mean?
Error 0xF1 signals waste ink pad saturation, requiring either professional service or DIY pad replacement followed by counter reset. The waste ink pads absorb excess ink from cleaning cycles and border-less printing. Continuing to print after this warning risks internal ink overflow and permanent damage.
4. Why won’t my computer recognise my Epson printer via USB?
USB recognition failures stem from driver corruption, cable defects, or port conflicts. Uninstall all Epson entries from Device Manager, disconnect the USB cable, restart your computer, then reconnect whilst monitoring device enumeration. Use certified USB 2.0 cables under 3 metres with ferrite core shielding for reliable connections.
5. How often should I clean my Epson printhead?
Execute nozzle checks weekly for high-volume users, monthly for moderate use. Only perform cleaning cycles when nozzle check patterns reveal actual blockages—excessive cleaning depletes ink rapidly and accelerates waste pad saturation. Most users require cleaning only every 3–4 months under normal operating conditions.
6. Can I use third-party ink cartridges in my Epson printer?
Compatible cartridges function in most models but introduce additional failure vectors including chip authentication problems, inconsistent ink formulations, and potential firmware incompatibilities after updates. Whilst offering cost savings, they may void warranties. Always purchase from reputable suppliers with proven compatibility for your specific model.
7. Why are my Epson printer colours incorrect?
Colour inaccuracies result from incorrect media type selection in driver settings, clogged nozzles affecting specific colour channels, outdated ICC colour profiles, or depleted cartridges. Verify driver settings match physical media, execute nozzle checks for each colour, and replace any cartridges showing low levels.
8. How do I fix my Epson printer’s Wi-Fi connection problems?
Wireless instability stems from signal interference, inadequate strength, or authentication failures. Position printers within line-of-sight of routers, manually configure routers to non-overlapping channels (1, 6, or 11), and consider static IP addressing rather than DHCP. For reliable connectivity in congested environments, hardwired Ethernet connections eliminate wireless variables.
9. What causes Epson printers to print blank pages?
Blank pages indicate completely clogged printheads, improperly installed cartridges, protective tape remaining on new cartridges, or depleted ink despite displayed levels. Verify all protective films are removed, reseat cartridges firmly, execute power cleaning cycles, and if problems persist, consider manual printhead cleaning or professional service.
10. How do I reset my Epson printer to factory settings?
Access your printer’s LCD control panel, navigate to Settings → Restore Default Settings → All Settings. This clears custom configurations including network settings, paper defaults, and maintenance counters (excluding waste ink pad counters which require separate utilities). Document current network settings before resetting to expedite reconfiguration.